
HOW A SONG IS CREATED
OK. We've had a look at the basic structure of a song; now let's examine how to create a song. Firstly, clear the loaded song by selecting New from the Project menu then clicking Clear All in the window that appears.
Load instruments
By default OctaMED has no instruments in memory; they must be loaded in. You can either select Load Instrument(s) from the Instr menu, or click the small GetFile button sandwiched between the instrument number and name in the Main Control window.
.png)
Try loading in some samples (if you don't have any, most PD libraries will be happy to help). Remember to select the instrument number first using Shift← and Shift→. Use the Volumes button in the file requester to select the correct disk. You can select more than one instrument by holding down Shift and clicking on several files (then click Ok); the instruments are then loaded into successive instrument slots.
Enter notes
Firstly, select the instrument that you wish the note to be played on. Use Shift← and Shift→ as usual. Next, position the cursor where you wish the note to be in the Tracker editor. Use ↑, ↓, Alt← and Alt-→ for this.
Now switch edit mode on by clicking on the Edit check box (Main Control window). Then play the note using the keyboard The note name, octave number and instrument number is entered.
Just what is this ‘octave number'? Well, OctaMED arranges the Amiga's keyboard into 2½ octaves. However, OctaMED's instruments can play using more octaves than this, depending on the instrument's type. Samples, for example, can play using 3 octaves, numbered 1 - 3 (this is the octave number).
So how do you play the extra octaves? Well, by default the keyboard's lower octave (Z - M) plays using octave number 1, the middle octave (Q - U) using number 2, and the upper half-octave (I - ]) using about half of 3. This can be changed by using function keys F1 - F5.
Find the Oct cycle gadget in the Main Control window. The 12 refers to the lower octave and middle octave's current octave numbers, 1 and 2 respectively. Now press the F2 key. The Oct gadget is now 23. So the lower octave's number is 2 and the middle octave's 3. (The upper half-octave uses about half of octave 4, but since samples can only play using 3 octaves you can't use octave 4 with samples).
Confused? Try entering a few notes, using F1 to select octaves 1 and 2 and F2 to select 2 and 3, and examine the octave number of each note. For example, how about a bass drum instrument on track number 0 every fourth line (000, 004, 008…), and maybe a hi-hat on track 1 every second line? Stick with something very simple like that to start with, and it shouldn't be long before entering notes becomes second nature.
Remember to use the Block Play button in the Main Control window to play the block through. Remove notes (that is, enter a blank note: — 0) by positioning the cursor over the offending note and pressing the Del key.
Add new blocks (and change their length)
By default there is just one block in the song, number 0. To add a new block, select Append from the Block menu's New submenu. Look at the block status display in the Information window and notice that the last block in the song is now number 1. Select this block by pressing Shift↓, and return to the previous block using Shift↑.
Usually blocks are 64 lines long. (Note for musicians: this allows for 4 measures of 4/4 time; each line is one sixteenth-note.) You can change this length if you so desire by selecting Set Properties from the Block menu. Click inside the Length box in the window that appears, delete the 64 using the Del or Backspace keys, and type in the new length and press Return. The maximum length is 3200 lines.
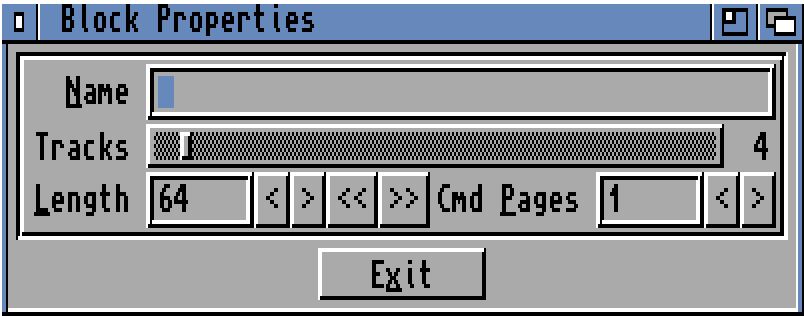
In the Block Properties window you can also name a block by typing its name into the Name box; its name appears in the block status display. Using the Tracks slider you can change the number of tracks (maximum is 64), but this is only useful when using 5 to 8-channel mode or MIDI (explained later).
Open the Block List window by selecting Block List from the Block menu. This window provides a list of all blocks and their names. The blue bar highlights the block currently shown in the Tracker editor; select another block by clicking on its name or number in the list. The Append New button is the same as Append in the Block menu; Insert New inserts a new block at the current block position (same as Insert in the Block menu).
The Block List can also be opened by clicking the small B button in the Information window. Holding down a Shift key while clicking this button opens Block Properties.
Link the blocks together
As discussed in part 1.4, to create a song blocks are linked together by creating a list of blocks in the order they should be played. This list is called the playing sequence. You can open the Playing Sequence window by selecting Playing Sequence from the Song menu.
There is always at least one line in the list, and by default it's block 000. Change this number using the two arrows just below the list (note that the number can't be increased beyond the number of the last block in the song). Add a new line by using the Insert or Append buttons, in the same way as for blocks. In the Block List, the Ins to Seq and App to Seq buttons insert and append the block currently shown in the Tracker editor to the playing sequence.
The display box just below the list shows the current playing sequence line number and the total number of lines in the list. This is duplicated in the Information window. When Follow is switched on, the current playing sequence line number is kept as close to the middle of the list as possible during play (try clicking Play Song with Follow on to see this effect).
Save the song
Select Save from the Project menu. If there is no filename in the box at the top of the Save Options window, a file requester appears to select a name. Switching Create Icon off prevents OctaMED saving an icon file with the song (for use with Workbench).
Clicking repeatedly on the No Compression cycle gadget selects one of several forms of compression (or none at all), reducing the file size. Calculate Size calculates the entire song's size using the current settings (use the Packed button to calculate the song's size when compressed).
Click Save to save the song.
Next up: Player commands.